Ninja 400 Riders Forum banner

EVAP canister removal

1 reading
69K views 123 replies 35 participants last post by  spurscar  
#1 ·
1. Remove the LH side fairing to gain access.

2. Pull the vapor supply line off at the fuel tank end.

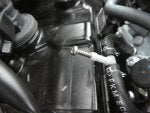
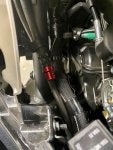
3. Unclip the connector for the power supply to the purge valve solenoid:


4. Remove the purge line at the three-way joiner where it splits into two lines before connecting to the throttle bodies:


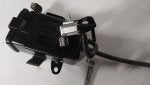
5. Block off the exposed line with a screw or such like.


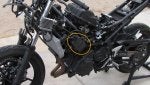
6.Remove the two bolts that attach the canister cradle to the frame.


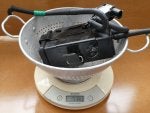
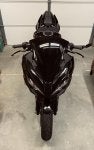
7. Remove the whole system.

 
#5 ·
Great question! 715 grams or 1.58 lbs.

Did it throw a code from unhooking that switch? If it does, I am sure that can be removed through the ecu, or with a resistor, like is done with Kleen system removal.
Yep it brought up code 3A which is Purge valve malfunction, wiring open or short (Equipped Models)

So now I have two codes showing! Hoping to get all that cleared out with the re-flash.
 
#9 ·
Tried this today, with the intention of also taking care of the error code.
With just the removal of the left side fairing, I ended up leaving the purge line connected to the three-way joiner but removed and plugged it at the cannister end. This was because it looks like you can't access the joiner unless you have the tank and airbox off..

To prevent the error code, take a 680 ohm half watt resistor, and cut the legs so they're about 20 mm long. The legs can then be bent around and pushed into the purge valve socket. The resistor legs are a nice fit into the socket pins and should go in about a centimeter or so.

Job done, no purge valve error code :devil:
 
#34 ·
Thanks! Wish I would have asked *before* I let the tank (with that nipple plugged) sit on the floor of my garage with the sun hitting it through the open door (was hot) until pressure built and it started leaking fuel in a puddle on the floor.
 
#35 ·
Dragging this one back out - I didn't ride for a week or two while I was traveling/waiting for parts and my battery was dead when I went to ride yesterday. I'm guessing the circuit stays open with the ignition off and the solenoid plugged in, but with the resistor in, it completes the circuit so the resistor is constantly dissipating all the battery's charge as heat over time. I removed the solenoid from the canister and disassembled the solenoid itself, I see if it's enough when plugged in to still avoid the light - if not, I'll reassemble at least the solenoid part, which should be enough.
 
#36 ·
Well I'm glad I'm not the only one who has had this issue. I've tried two different types of resistor now with no luck so I've just gone back to ignoring the light which is going to be on anyways because of the gearing change.
Man bikes are getting complicated these days. Doesn't encourage modding! :grin:
 
#42 ·
Does anyone know how long I need to run the bike before expecting the CEL to go away once a condition is fixed? I pulled the resistor out for the sake of my battery and put the minimal amount of the switch there (see pics below). I started the bike - ran fine, no CEL. I disconnected the plug and started the bike, instant CEL. Still lit after I plugged it back in but I'm pretty sure it will take some "no error condition" cycles to clear.
 

Attachments

#43 ·
AFAIK unless you get a Kawasaki dealer to plug into the Kawasaki diagnostics system (KDS) plug at the rear of the bike or you flash your ECU using software that has the ability to do same then you have to do the riding sequence that is mentioned on here somewhere in another thread. 'clearing error codes' maybe. I don't have time to search at the mo sorry.
 
#55 ·
I am in New York, the east coast, and I have the EVAP canister. I just looked and like Kiwi said, you can’t miss it.
Left side of the bike, below the gas tank, you can see it with the fairing on. I will look into getting rid of it in the off season, which is here. :crying:
 
#57 ·
#58 ·
Since I removed my EVAP and plugged the hose to the tank I've had a good amount of vacuum created in the tank, it's very noticeable when I open the gas cap to add gas. I have to get my fingernails under the edge of cap to pry it open. So I bought one way breather valves for dirt bike gas caps and replaced the plug in the hose with it. When I opened the hose it took a while for it to equalize pressure in the tank. See pics below. I did test if the one way function actually worked with a syringe and on these cheap valves it did not, water squirted right out of the vent holes. My feeling is that the system is built so little or no gas actually gets out through the vent, they wouldn't want fuel in the EVAP canister I would think. So I went ahead and installed and I'll see how it goes. At least I don't have to worry about fuel starvation.
 

Attachments

#61 ·
I’d remove the valve or replace it with a long hose if you want something there, because I’m pretty sure it needs to breathe both ways. I left a cap over that little nipple on the tank while I was doing some tank-off work - the sun coming in through my open garage door hitting the tank on the floor heated it enough to build pressure with nowhere for it to go. The result was a big pool of fuel on my garage floor.
 
#64 ·
I don't have this evap can. Should I be worried?
 
#67 ·
Right its a box with a metal bracket, I am familiar with it, and swear mine had it, it does not. I currently have the fairings off the bike and its not there


The thing that has me baffled is I swear I saw it on mine and its not there now.......lol oh well, guess I never had it, maybe I saw it on one of my other bikes or something?
Not sure now, anyway, no longer a problem for me :)