Ninja 400 Riders Forum banner

EVAP canister removal

70K views 123 replies 35 participants last post by  spurscar  
#1 ·
1. Remove the LH side fairing to gain access.

2. Pull the vapor supply line off at the fuel tank end.

3. Unclip the connector for the power supply to the purge valve solenoid:


4. Remove the purge line at the three-way joiner where it splits into two lines before connecting to the throttle bodies:


5. Block off the exposed line with a screw or such like.


6.Remove the two bolts that attach the canister cradle to the frame.


7. Remove the whole system.
 
#69 ·
I’ve run into an issue with the purge valve.
my bike is not equipped with it, and I sold my flashed ecu to a local friend who also likely does not have a purge valve. Now I am logging a purge valve circuit fault. I am looking for the connector to add a resistor to trick the ecu. I am assuming they make one wiring harness to fit both emission levels and a plug or two may not get used on each model.
Any ideas?
 
#70 ·
I’ve run into an issue with the purge valve.
my bike is not equipped with it, and I sold my flashed ecu to a local friend who also likely does not have a purge valve. Now I am logging a purge valve circuit fault. I am looking for the connector to add a resistor to trick the ecu. I am assuming they make one wiring harness to fit both emission levels and a plug or two may not get used on each model.
Any ideas?
I think if my memory serves, the canister uses a resistor and the purge can either be a resistor or you can buy a plug with resistor from TST. I think if you do a search on here there is a few threads.
 
#71 ·
I didnt plug my empty connection with a resistor as the Woolich software I flashed my ECU with had a function for disable purge valve which seemed to eliminate an error code showing.

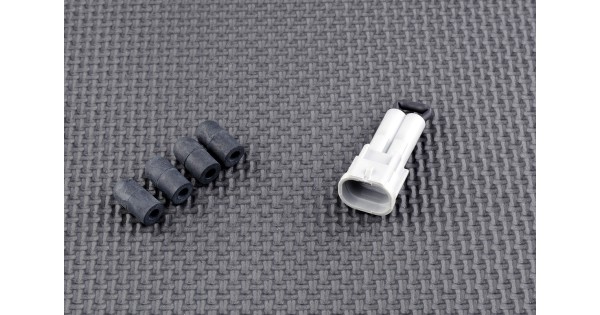
This is a good option for you at $23.55
 
#72 ·
what i am saying is my bike is not equipped with the evap system from the factory, and does not have a connector to add a resistor to. i am selling the bike, and going with a flash tune software is not an option at this point.

at this point i think my only option is to splice into one of the O2 sensor circuits and maybe add a terminal and wire to the ecu connctor if it is blank. going from the schematics, i'll have to add the circuit to the ecu connector and use a resistor there to stop the fault from logging. i was hoping the connector was hidden inside the harness or something but that does not seem to be the case
 
#76 ·
Since this thread has been resurrected, quick PSA for anyone reading it and worrying if replacing the evap purge valve with a resistor is going to drain their battery, I found the actual cause of my battery drainage a while back and fixed it.

My Innovv K2 dash cam came with a power converter that was drawing current even with the ignition off (and even with the park shock feature disabled). They went through two iterations of updates to the converter, but the real fix was to wire a relay into the circuit to cut battery power to the converter 10 seconds after the acc circuit lost power (i.e. key off). This allows the last file to finish being written, but stopped the power drain. My bike sat weeks during this past winter and no batter drainage issues since I installed a relay.
 
#84 ·
Kiwi, Think you and I are close in weight so we're on a mission to ride a light motorcycle. I tried to ride a buddies BMW F800GS, almost made it out of the parking lot and realized there was no way to touch the ground, traded right back before I did something stupid.
KawasakiBrad parts aren't cheap after shipping but are specialized. You've seen me wrestle with error codes so hopefully this will go smoothly.
 
#88 ·
This is not a "how to" but just some pics from the Evap canister removal from a California Z400. I received a "California Kawasaki Purge Valve Bypass" from KawasakiBrad out of Canada. It was a matter of fiddling around and thinking about what would actually be removed and where the electric part plugs in. Kind of a Zen project. I left the tubes in place for now, the canister itself has only two tubes and no electronics. After the Purge Valve Bypass was installed, took it for a 10 mile ride around town and some freeway. The Z400 thinks it has a Evap Canister, No codes/errors!
A note: It did not trigger a code after I disconnected the tubes but left the stock valve on. But you know these 400s, with my luck the codes/errors would show up much later. So glad I bought the Purge Valve Bypass.
Image
Image
Image
Image
 
#91 · (Edited)
My girl did her Ninja 400 2018 EVAP canister deletion today using Smart Moto electronics sensor and plug. The procedure was super easy (99% of the time was spent to take the left fairing off). As said above in order for her to put the plug on the three way hose a removal of the tank and airbox was needed, so instead she put the plug here(see the red circle) leaving only a tiny hose (92192C). When she changes sparkplugs or delete her PAIR valve and airbox removal is needed, she may swap the plug to the three way hose. My point is that the delete requires only fairing removal. See the picture below and feel free to ask her if something is unclear on her insta @kotaronis
16772

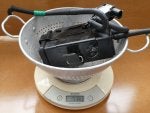
Her weight savings were ~ 682 grams. The kit weighs 3 grams. Photos and brief video of the steps you can see on this link - www.instagram.com/p/CKd0oaAHwXm
I wrote this post just, because even tough lots of you guys have said something on the topic at the end some things were left unclear.
 

Attachments

#92 ·
My girl did her Ninja 400 2018 EVAP canister deletion today using Smart Moto electronics sensor and plug. The procedure was super easy (99% of the time was spent to take the left fairing off). As said above in order for her to put the plug on the three way hose a removal of the tank and airbox was needed, so instead she put the plug here(see the red circle) leaving only a tiny hose (92192C). When she changes sparkplugs or delete her PAIR valve and airbox removal is needed, she may swap the plug to the three way hose. My point is that the delete requires only fairing removal. See the picture below and feel free to ask her if something is unclear on her insta @kotaronis View attachment 16772
Her weight savings were ~ 682 grams. The kit weighs 3 grams. Photos and brief video of the steps you can see on this link - www.instagram.com/p/CKd0oaAHwXm
I wrote this post just, because even tough lots of you guys have said something on the topic at the end some things were left unclear.
Good info. Always good to not have to remove the tank and airbox.
 
#94 ·
Hi all
First post, so forgive me if this has been answered. I have removed the evap canister and I’m wondering about the very short breather line that’s left running from the tank. I’ve done this for the time being, but should I get a longer line and route toward the ground like the overflow line?
17562
Also just double checking this will do the trick to plug where it splits off under the tank, as opposed to the screw solution?
17563
Thanks in advance
 
#97 ·
Hello guys, anyone that has plugged the vent line from the tank had vaccum problems? I believe there is another breather hole in the tank cap but dont know if it is tow-way or one-way. The kit from smartmoto electronics has 3 plugs, one for each hose, there should be no vaccum i believe. On my bike still with the evap system in hot days there is a lot of pressure in the tank, there is even a small whistle coming from the gas tank cap, i believe it breathes in and out gas vapor, when i open the cap it quickly blows all the pressure out and you can hear it very clearly. I havent done the delete yet but i am considering it.
 
#102 ·
Now that this post has been revived. Does anyone have an image of what a stock Ninja 400 without an evap canister looks like? I.e. what does it do with the vent line?

I want to remove the canister, primarily to get some space on the left side, but I'm paranoid about plugging things / leaving things open that are petrol related. Figure a Ninja 400 without the emissions junk must have something in its place (at the tank vent), so I could do something similar.
 
#103 ·
In the photo from further back, you see the two hoses for gas tank overflow and vapor vent. They simply run to the belly pan, no problem. Also, the voltage regulator is relocated to a safer spot. In the closer up you see the black connector for the purge valve with a white bypass unit plugged into it and just above it the hose that was attached to the evap canister closed with a clamp and screw. Hope this helps .. .. ..
17999
18000
 
#105 ·
Sorry, another one. I removed the evap canister, and left the purge valve to avoid a CEL until eliminator plug is delivered. I then blocked the tube going from the canister to the valve, and ran the one from the tank into a catch can, where my fuel overflow is also running.
Does anyone see any issues with this? What does the valve itself do?

I guess my concern is the valve has some kind of vacuum involved and will break/crack the shits if I've plugged it's inlet.
 
#108 ·
I am installing the Norton Motorsports Block off plate and AIS removal kit. It comes with 2 small vacuum caps. The first one goes on the T junction, correct? Does the second cap plug the gas tank where the hose connected from the evap canister? Or do I run the hose down instead? Or does the second cap go somewhere else?
Like these previous photos?:
Image
Image
 

Attachments

#120 ·
Generally run them into overflow bottles, right? Might be wrong/might vary by bike, but I had been told the overflow can get some love at large lean angles with a full enough tank.
Personally I just kept anything that was routed to the bottom of the bike, and instead routed them into an overflow bottle. So that was:

  • Coolant overflow, direct from radiator to overflow bottle (no OEM holding fluid). Overflow bottle mounted to frame below the radiator outlet.
  • Fuel overflow, into overflow bottle
  • Vent, after evap removal, straight into overflow bottle, which I mounted where evap used to be

Works well for me, generally neither have anything in them unless I wash the bike with the tubes connected.
 
#119 · (Edited)
The forward nipple on the left side of the gas tank is the fuel tank overflow. If you overfill the tank it will drain through this directly onto the ground.

The rear nipple on the left side of the gas tank is a vent that goes into the charcoal canaster, if fitted. If no charcoal canister, it goes into a connector (14069 "Breather, Fuel Tank) which then goes to the ground.

Without charcoal canister.
Image

Charcoal canister
Image