

In my quest to turn my Ninja into the skeleton bike I decided to rip another chunk of it off today. I've got a bit of a thing about emission control add ons, it's just extra clutter IMO. So I lowered my sights on the PAIR valve assembly today and removed it.
The PAIR valve system injects air taken from the airbox into the exhaust ports to aid further combustion of unburnt fuel left over from the combustion process. It's also a way of diluting emissions down for the sniffer test when manufacturers are trying to meet the stringent emission regs we have now like Euro 4.
Removing it has no effect on the way the bike runs but can reduce popping on deceleration esp if you are running an aftermarket exhaust system.
Here's how to remove it:
1. Remove the larger of the two hoses coming out of the RH side of the airbox.
![]()
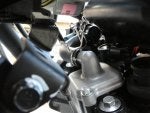
2. Remove the rubber hose attached to the pipe that goes into the rocker cover.
![]()
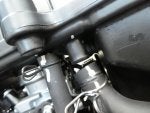
3. Disconnect the electrical connection (light blue plug)
![]()
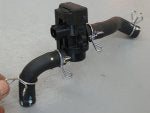
4. You can now remove the PAIR valve assembly.
![]()
5. Cover over the hole in the airbox with electrical tape or some sort of cap and find a plug for the rocker cover pipe. I found this rubber one at work and used 'Heldite' as a sealing compound. Great product, made in England so must be good")
![]()
![]()
On a test ride I found the bike run exactly the same as before removal.
I do have another error code showing now - 64 Air switching valve malfunction, wiring open or short.
The PAIR valve system injects air taken from the airbox into the exhaust ports to aid further combustion of unburnt fuel left over from the combustion process. It's also a way of diluting emissions down for the sniffer test when manufacturers are trying to meet the stringent emission regs we have now like Euro 4.
Removing it has no effect on the way the bike runs but can reduce popping on deceleration esp if you are running an aftermarket exhaust system.
Here's how to remove it:
1. Remove the larger of the two hoses coming out of the RH side of the airbox.
2. Remove the rubber hose attached to the pipe that goes into the rocker cover.
3. Disconnect the electrical connection (light blue plug)

4. You can now remove the PAIR valve assembly.
5. Cover over the hole in the airbox with electrical tape or some sort of cap and find a plug for the rocker cover pipe. I found this rubber one at work and used 'Heldite' as a sealing compound. Great product, made in England so must be good


On a test ride I found the bike run exactly the same as before removal.
I do have another error code showing now - 64 Air switching valve malfunction, wiring open or short.


