Ninja 400 Riders Forum banner

Engine Top End Disassembly with Norton Cylinder Coolant Seal Replacement

31K views 94 replies 18 participants last post by  bibire95  
#1 · (Edited)
Well, I decided to replace the OEM cylinder coolant seal with the Norton seal because of green piss. I started this on Monday and assembled everything by Saturday. That is 6 days plus add another 3 days for the liquid gasket sealant of the cylinder head cover to fully cure (as per instructions). Finally, add one more day to flush and replace the coolant with test ride. In total, it would take an amateur like me 9 days to complete this job solo. Sure a pro garage could do it in half the time if they got all the replacement parts readily available. Presently, I have not fired it up yet, I'll wait till next weekend to flush and add coolant and the long awaited test ride. So if you want to tackle this job be prepared! Have all the proper tools, garage, parts, and patience beforehand. This is a one time deal, so replace all the parts that call for replacement according to the service manual. Hence, I didn't reuse anything like o-rings and seals, because I would probably cry if I had to tear into it again should a seal immediately fail.

I won't go into a step by step DIY, as you'll find all that in the service manual. I will highlight some of the quirks and observations that I ran into.

1. Before disassembly, always CLEAN the exterior of the engine thoroughly, especially around the throttle-body to head coupling. You do not want any debris falling into the valves. I used a mild spray cleaner like Simple Green and Maxima Suspension Kleen for those hard to reach spots. It's not as harsh as brake cleaner and safer for some rubber parts. Spent a good amount of time cleaning debris that fell into the valves, lol. I have no air compressor, so I had to suck debris out, using a vacuum.

2. Spark plug with over 10000 km. With about 4000 km stock tune and 6000 km with the Norton Power Package (filter, exhaust, v-stacks, ECU flash). Poor lighting, it's actually a much lighter brown colour than what is pictured.
Image


3. I used a Canadian Toonie to open the two sight caps of the left side generator cover. A thick enough washer with a vise grip will suffice. Align the crank as best you can at the "|" mark. If you overshoot this mark, DO NOT turn the crank clockwise. I don't know the technical reason, but I heard bad things could happen. Simply turn it counterclockwise again till you reach it.
Image


4. Cover intake holes with clean rags or plastic and rubber bands.
Image


5. Be sure your crank position is still lined up at the "|" mark. Your cam timing marks should be here before removal. Mark them with paint or a sharpie, so they can be installed the same way. Take pics if you have to.
Image

Image


6. I took good bit of time removing/scraping the carbon buildup at the piston crowns and combustion chamber. At the combustion chamber, there was about a 2 to 3 mm thick layer of carbon around the left and right edges.
Image


after cleaning
Image


Image


after cleaning
Image


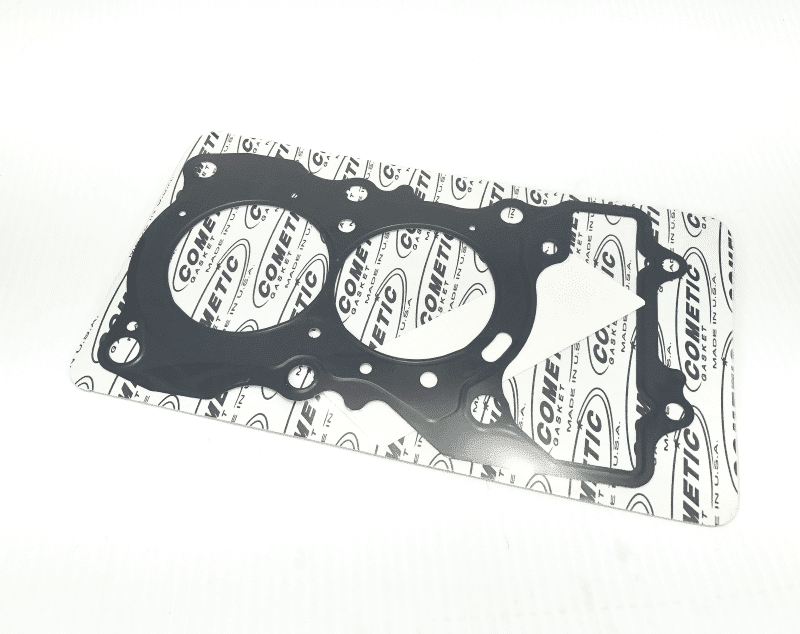
7. The dreaded OEM rubber coolant seal. Notice the aluminum gasket has an adhesive coating on both sides. Be careful when handling the new gasket as not to contaminate the coating.
Image


continued...
 
#2 · (Edited)
continued...

8. Be sure to clean all mating surfaces and remove all the residual oil in the screw holes as not to induce hydro-lock when re-tightening.
Image


9. Kawasaki recommends molybdenum disulfide oil solution to coat the piston skirts, rings, cylinders, bolt threads, washers, cam lobes, journals. Molybdenum disulfide (MoS2) oil solution is a mixture of engine oil with molybdenum disulfide grease in a 10:1 ratio, respectively. That is 10 parts engine oil and 1 part MoS2 grease. Mos2 grease is a dark gray almost black pasty material used in lubrication to parts such as the clutch pull rod to pull arm lever joint, also in final output drive shaft splines, etc. You can get moly grease from flea-bay. Yamaha's product line of Yamalube carries the moly grease. Or, I used a product called Red Line's Assembly Lube Liquid Formula. It has the liquid like viscosity of oil with the added moly. You'll have to order 2 head bolts, so you could cut their heads off to produce guide lines for cylinder assembly. At this stage, you'll need a helping hand to guide the cylinder to the block as you press the rings into the pistons to the cylinder. This was probably the hardest part of the job. Just be sure the cylinder is level as it is mated to the block.
Image


10. My OCD has forced me to use both a clicker and beam torque wrench to get the correct torque values, lol.
Image


Be sure the camshaft cap bolts AND screw holes (12 of them) are clean, dry and free of residual oil. The specs here call for a dry torque value!! I used brake cleaner. I would have replaced these bolts if I had to do it again, even though the manual does not specify to, because they looked and smelled burned. They have a brown, charred colour to them and smelled really bad, like cooked all to h e l l.
Image


11. Bought this nifty torque angle clocking tool from flea-bay or scamazon? It is needed to clock the 6 headbolts.
Image


12. Kawa sells the liquid gasket sealants but are way overpriced, and backordered. I used threebond silicone liquid gasket sealant 1211 (white colour) and Hondabond HT for the cylinder head cover. It is way too easy to use too much sealant. All that is needed is a 1 mm bead. It's a 3 day curing time.
Image


Like I said I will add the coolant and fire it up this weeknd. I turned the crank and verified it was ok upon assembly. Fingers crossed. TBC.

EDIT: Almost forgot to mention regarding the valve shims and buckets. Be sure to secure them, in that they don't fall out of the valves or you may lose the shims or get them mixed up when installing. Never mix up the shims and buckets or your valve clearances will be skewed. When I decided to clean the combustion cylinder, I forgot to remove the valve shims and buckets. Some fell out. Luckily they were returned to their correct valves.

For fun, you can decide to check your valve clearances if you got feeler gauges at hand.
 
#5 ·
continued...

8. Be sure to clean all mating surfaces and remove all the residual oil in the screw holes as not to induce hydro-lock when re-tightening.


9. Kawasaki recommends molybdenum disulfide oil solution to coat the piston skirts, rings, cylinders, bolt threads, washers, cam lobes, journals. Molybdenum disulfide (MoS2) oil solution is a mixture of engine oil with molybdenum disulfide grease in a 10:1 ratio, respectively. That is 10 parts engine oil and 1 part MoS2 grease. Mos2 grease is a dark gray almost black pasty material used in lubrication to parts such as the clutch pull rod to pull arm lever joint, also in final output drive shaft splines, etc. You can get moly grease from flea-bay. Yamaha's product line of Yamalube carries the moly grease. Or, I used a product called Red Line's Assembly Lube Liquid Formula. It has the liquid like viscosity of oil with the added moly. You'll have to order 2 head bolts, so you could cut their heads off to produce guide lines for cylinder assembly. At this stage, you'll need a helping hand to guide the cylinder to the block as you press the rings into the pistons to the cylinder. This was probably the hardest part of the job. Just be sure the cylinder is level as it is mated to the block.


10. My OCD has forced me to use both a clicker and beam torque wrench to get the correct torque values, lol.


11. Bought this nifty torque clocking tool from flea-bay or scamazon? Needed to clock the 6 headbolts.


12. Kawa sells the liquid gasket sealants but are way overpriced, and backordered. I used threebond silicone liquid gasket sealant 1211 (white colour) and Hondabond HT for the cylinder head cover. It is way too easy to use too much sealant. All that is needed is a 1 mm bead. It's a 3 day curing time.
View attachment 18077

That's all I got for now. Like I said I will add the coolant and fire it up this weeknd. I turned the crank and verified it was ok upon assembly. Fingers crossed. TBC.
That cover should have a rubber gasket on it too and the liquid gasket (Kawabond or whatever you choose) goes on that, basically between the rubber gasket and the cover. Or was it just still on the cylinder head when you took the picture hence it's not on here?

You were very thorough though with the work. You can save a lot of time by not taking the cylinders off, I just lifted it about an inch, pulled the seal out and put the new one back in then dropped it down. That way I didn't need to replace the gasket in between deal with cleaning the surfaces, aligning, etc. Also can save a lot of time if you don't clean the pistons off, although yours looked to have a lot more build up. How many miles on it when you did this?

I pretty much re-used like everything, except the head gasket since I was planning on replacing that anyway. Re-used all the bolts, washers, spark plug, cylinder gasket, valve cover gasket and the o-rings in the cover. Took me a long time from start to finish but just because I waited like 4 weeks for all the parts to arrive. One day to take everything apart, and 2 days to put it back together because I had a **** of a hard time degreeing the cams.
 
#3 ·
OK, good job and thank you for sharing this info. I have 2 questions.

1 - The service manual shows an alignment of the camshaft sprockets that is different from the alignment in your pictures, i assume that in your picture is how it came from the factory, are we supposed to install with the alignment of the service manual or as it came from the shop? Because it looks to me to be different from the instructions in the service manual.

2 - We tighten the cylinder head bolts first to 20 Nm and then use the torque angle gauge to tighten them to 120º even tho we already tightened them to 20Nm ?
 
#9 ·
Yeah that's what I ended up doing too in the end. Just did it per the manual which was easy. But before I tried to set them at the degrees recommended by Norton since I got their reground cams. I only got the intake cam to be at the specified degrees, the exhaust came is off by 4 degrees, so it's likely not optimal as far as peak power and where the peak is but I didn't want to mess with it any longer. I didn't realize until afterwards that I was supposed to use the slots in the cam gears instead of the holes used from the factory. Oh well....next time. Didn't feel like taking everything apart and redoing it to gain maybe like half a horsepower.
 
#13 ·
Thanks for the detailed pics. I hope I never have to this job...

I’m with SBK, If I ever have to do this I’m definitely going with the thinner head gasket...

 
#27 ·
I thought about installing this as well. Then I read that this thinner head gasket alone will get you another 1/2 HP. The butt dyno won't recognize it. A mod like that is best used in conjunction with other head mods. Also, running higher compression results in more heat. More heat can induce detonation, ergo, higher octane gasoline will be required. This just may be the answer to help reduce the carbon buildup in the combustion chamber, haha. I'm new to all this and is it's just theoretical jargon, lol. You could be a heroic guinea pig.
 
#25 · (Edited)
Thanks for this excellent question. I ran out of brake cleaner, so I used Maxima Contact Cleaner and gently wiped the crap off with a clean shop towel. The carbon and gunk on the pistons were easier to remove than the stuff in the combustion chamber. In the combustion chamber, I used a small flat tip screw driver, a pick and brake cleaner to gently scrape the gunk off. IMPORTANT If you're gonna be cleaning and handling the pistons, please make sure the piston rings gaps are clocked correctly. The rings are easily turned and run off of their clocking position. Kawa's ring gap diagram is so crude, they don't even show degree angles. Maybe the actual angles are somewhere in the manual? Anyone know?
 
#24 ·
I did not notice any signs of coolant leak into the cylinders. The way it's designed, the coolant could leak into the bottom end, not the cylinder. But there's not knowing for sure until you get an oil analysis.
 
#28 ·
Ok, so I fired her up Saturday morning. Sounded great, rode great, probly stronger than ever. Whew what a relief, was kinda nervous at first. Thank God, no leaks in the head area, apart from a small oil leak in the clutch cover area because of a re-used clutch cover gasket. Was gonna use a new one, but decided otherwise because I will do an oil and filter change again, shortly.

Talking about coolant flushing, it took me the whole bloody day. I did find a little bit of "white cotton-like wafts" in the water during the first flush. This signifies the aluminum in the radiator/engine is starting to corrode. The new coolant I used was Honda Type 2 antifreeze that I already have lying around. Also added Samco silicone radiator hoses to replace the weak azz OEM tubes. And zip-tied the leaking rubber hoses connecting the reserve tank to reinforce the weak wire clips.

It was a 5 step flushing procedure:
1. Flush with distilled water and vinegar solution of 50/50.
2. Distilled water flush
3. Another distilled water flush
4. Coolant added 50/50 mix
5. Second coolant flush using another 50/50 mix (this second coolant flush ensures a proper 50/50 mix).

Long procedure, but the good news is, it's a 3 year service interval.
 
#29 ·
Ok, so I fired her up Saturday morning. Sounded great, rode great, probly stronger than ever. Whew what a relief, was kinda nervous at first. Thank God, no leaks in the head area, apart from a small oil leak in the clutch cover area because of a re-used clutch cover gasket. Was gonna use a new one, but decided otherwise because I will do an oil and filter change again, shortly.

Talking about coolant flushing, it took me the whole bloody day. I did find a little bit of "white cotton-like wafts" in the water during the first flush. This signifies the aluminum in the radiator/engine is starting to corrode. The new coolant I used was Honda Type 2 antifreeze that I already have lying around. Also added Samco silicone radiator hoses to replace the weak azz OEM tubes. And zip-tied the leaking rubber hoses connecting the reserve tank to reinforce the weak wire clips.

It was a 5 step flushing procedure:
1. Flush with distilled water and vinegar solution of 50/50.
2. Distilled water flush
3. Another distilled water flush
4. Coolant added 50/50 mix
5. Second coolant flush using another 50/50 mix (this second coolant flush ensures a proper 50/50 mix).

Long procedure, but the good news is, it's a 3 year service interval.
Hard to believe how 3 years has passed by. I remember just joining the forum. Glad to see it turned out fine for you man. I could only imagine how nervious you were before the first start after all that work. For me just changing the plugs at the first time gave me a pumped heart rate as I was eager to not **** something up. And when I came to start it, the cliche came in on me hard, you could hear the fuel flowing, I pressed the button, and.. seized. I was sure I am into so deep trouble as it wasn't responding trying again and again...gone like that for a few minutes until I reliazed the red igniton button was at the off postion lol 🤣 pressed again and it started up fine, what a relief that was.

I am probably going to sell the bike due to me having to go through surgeries in both my elbows and one shoulder due to some messed up ****. If you want a good read and wtf moments google and youtube ulnar nerve subluxation and snapping triceps. I am not going to be able to use the bike for a long time, and together with all of it's known issues, I just decided to move on and hopefully when I am good again get in the future get a new bike. If I ever get there, hopefully, hardest time of my life right now.

Love and will always remember all the cool guys from this forum.
 
#34 ·
The cooling system is under tremendous pressures. It's only a matter of time when she springs.
 
#35 ·
Its only ONE more layer deeper than a valve check… which I already had planned. A pretty big step. The N400 seems pretty easy to work on so I am taking the dive. See you on the other side. Or deep in the thick of it somewhere…
 
#38 ·
Beware there are washers under the (6) head bolts that are supposed to be replaced with new ones, rather than reused. Since they seem integral to the 120 degree tightening, I will not try and skip them. I missed them in my first parts order, just ordered them now, and hope to do the job this summer.
 
#43 ·
Well, so far: Did tires, fork brace, new springs, new fork oil 15w, cleaned bmc air filter, replaced fuel filter, adjusted valve shims as the exhausts needed adjustments. Down to this level, getting ready for the cylinder header removal and gasket replacement. A miss ordered gasket for the header at the upper/lower connection meant a delay. Close. so close…

18920
 
#45 ·
Got my final gasket, so took the full top end off last night. Time to clean the pistons tonight. Not sure if this is standard build up, assuming so based on others. maybe .2 to .3mm buildup. I am guessing the buildup can be because of constant high rpm? The N400 is happiest above 7k. ;)

18988


18989

And that nasty gasket. Kink on the left side clearly the problem.
 
#48 ·
Cleaned it all up, ready for re-assembly starting tonight...
19000


19001


I started to cleaning with brake cleaner, thinking I would use a sharp plastic tool to scrape it all off. Ha! Quickly moved to a steel brush. Then moved to a screwdriver to carefully chip it all off. Brake cleaner and the screwdriver worked best for the Piston heads. I stayed with the metal brush for the valves, not wanting to even accidentally put a scrape gouge in them.

Ready to re-assemble!

FYI, thanks all here for the info and write-up. Definitely helped with confidence, bolstering the details of the manual which is reaaaally good.
 
#49 ·
Done! Finally assembled after all the time and effort. The coolant gasket is in, all bits are assembled, and the moto started up and sounds fabulous. There are a few notes that need mentioning, most specifically the cam chain and cam shaft installation.

There seems to be an issue in the manual about the camshaft timing setup. The removal happens at the “|” mark. This mark indicates when both cylinders are dead even. Then immediately following it talks about the installation, which seems to be at the same mark. However, later it mentions setting the camshafts at the 2|T mark. The manual does a good job of outlining the gear settings, so that part is pretty easy. It’s the cylinder marking that seems to be the problem.

The manual outlines the camshaft settings at 2|T. Except the problem is if installing the camshafts at this mark, and using the manual settings, then the cylinder 1 exhaust lobes have some positive contact with the valve buckets, and causes a slight lifting to the camshaft. It would work, but not ideal for finishing the assembly.

So, I installed at the 2T mark to line up the cams properly. Then rotated slightly to release the valve spring tension on the lobes. Then installed the camshaft cap. This worked great.

I had originally installed at the | mark, and when giving the crank a slow turn to test, it stopped where the second cylinder top was about to show, because the lobes clearly were opening the exhaust valves on cylinder 2, causing a bind.

So, mark the cams at the | setting for easy installation, or follow the manual at the 2|T mark knowing you will have just a little valve lifting in the 1st cylinder exhaust valves.

So glad all that is done. It purrs again. It took me three weeks from start to finish since I had to order the coolant gasket once noticed, and a few more bits since I was going deep.

The other reason to do this job is to clean your pistons. Surprised me at the buildup at 18k miles.

19031

Back together and stretching its legs with all the work. New Dunlop Q3+ tires, fork springs and 15w oil, plugs, air filter cleaning, fork brace install, valve adjustments and that @#$&*( coolant gasket.
 
#50 ·
Glad it worked out for ya!

Regarding the cam shafts install, the way I understood it was to install them exactly the same way as you removed them. Either by marking them with paint or sharpie or taking pics beforehand. The crankshaft must remain in the same "|" position.
Then install the cam chain, cam chain guides, the cam chain tensioner and cam caps. This way, no valves will be lifted by any of the cam lobes.

Next, when the crank is turned to the "2|T", the cam shafts with their "IN" and "EX" indents are automatically lined up. Essentially, the "2|T" position is a visual confirmation that everything is timed correctly.
 
#52 ·
As far as submitting some constructive criticism direct to Kawasaki:

My online submittal:
2018 kawasaki ninja 400 please update!

I am currently suffering through the coolant gasket replacement on my 2018
kawasaki ninja 400 abs krt. It is a known issue. The fix involves a LOT of
labor. This should not be a failure point. It still has not been fixed on
2021 models! Come on Kawasaki! It is well over a $1,000 USD repair in labor
due to the time to fix. Then several hundred dollars in gaskets and parts.
This is a ridiculous failure point with an easy fix. talk to Norton
Motorsports. Their gasket is great. Excellent solution. But still, the time
to fix is excruciating.


And their response. About what you would expect, and maybe they get enough pressure to do something, someday...

Thank you for contacting us.

Thank you very much for your report.
We have received your request as a valuable opinion.
So we would like to use it as a reference for future product development.

We look forward to your continued patronage of our company.

Thanks and best regards.

Web administrator

Motorcycle & Engine Company
Kawasaki Heavy Industry,Ltd

Had to plug Norton, as that gasket is longevity inspiring. Quality engineering.
@Norton-Motorsports.com
 
#53 ·
And thought I'd share some more of the pictures of the maintenance adventure:

19078

Cleaned and ready to rebuild the top end 'cake'.

19079

Lubed, gasket ready for coolant and header assembly.

19080

Used existing bolts for assembly line up. Didn't order two up, and the bolt diameter/thread size is not available at my local hardware store...
Ready for piston insertion.

19081

Piston inserted, first layer seated.

19082

Header on, gasket confirmed in proper place, bolts finger tightened, ready for torque'ing.

19083

Torqued.

19084

Cams installed and everything buttoned up.

Feels good on its first hard rip...
19085


And all that work, for a very happy rear tire story...
19086

The suspension upgrades for the front, and the shock settings ala Dave Moss, and the rear tire tells the story of all the love. The N400 sure does purr and hold a great line.
 
#55 ·
@Tracy , valve adjustment breakdown:

Going from Cylinder 1 to 2, left to right.
Exhaust1: .23, range is .25 to .31
Exhaust2: .25
Exhaust3: .24
Exhaust4: .25
Intake1: .15, range is .13 to .19
Intake2: .15
Intake3: .13, adjusted to .18. Prefer .1 inside range instead of on the outside of the range.
Intake4: .15

Adjusted all exhaust valve clearances and one intake. This is apparently standard expectations.
 
#90 ·
@Tracy , valve adjustment breakdown:

Going from Cylinder 1 to 2, left to right.
Exhaust1: .23, range is .25 to .31
Exhaust2: .25
Exhaust3: .24
Exhaust4: .25
Intake1: .15, range is .13 to .19
Intake2: .15
Intake3: .13, adjusted to .18. Prefer .1 inside range instead of on the outside of the range.
Intake4: .15

Adjusted all exhaust valve clearances and one intake. This is apparently standard expectations.
36k mile valve adjustment update.
Exhaust1 was again down to .23. Shimmed it up to .28. Everything else was still solidly within range. Nice to see it does not change much after the first check.
 
#57 ·